Thursday, February 21, 2008

Cyndi's Scrappy Sketch

I am a little behind. My SU! upline Cyndi has been doing scrapbook challenges. She is up to 4. I am only on 2! See all her great sketches @ http://www.scrappychick.typepad.com/ .


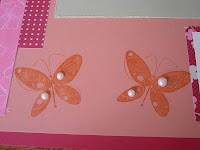
Here are the February camp pages based on her sketch


Sorry campers, I don't have enought pearls for everyone to have to add to the butterflies. BUT GET YOUR OWN PRETTIES KIT! "GAWGUS!"
Thanks for looking.

Wednesday, February 20, 2008

My new favorite tool - STAMP-A-MA-JIG

How did I put stamps together before? I thought I didn't need this little tool. But what a difference it makes.

Ever put your stamps together - and the stamped image was crooked? The top image looked good - but it didn't line up with the stamped image?

When you assemble your stamps using the Stamp-a-ma-jig the label will be placed exactly to match the rubber.

Step 1


Lay out all your accessories - stamp set, stamp pad (dark color is best), blocks, labels and Stamp-a-ma-jig (SAJ) and imaging sheet (from SAJ)

Step 2
Attach the label to the side of the case. This is an important piece of the stamp that is often left off. It lets you see what stamp set it is when it is stored (title of the set) and the number of stamps in that set (when you are stamping away and can't remember which birthday saying goes in which box!)


Step 3


Lay out all the blocks and choose which stamp goes with which size block. DO THIS BEFORE ATTACHING ANYTHING. Sometimes the stamp you think goes with a block does not!


Step 4


Attach the first stamp to the block. DO NOT ADD THE LABEL YET!

Step 5


Ink up the stamp. Line up the corner of the SAJ imaging sheet (rough side up) with your SAJ, and stamp the image in the corner of the sheet.


Step 6

Turn imaging sheet over. Line up the label STICKY SIDE UP, over the stamped image. Lightly adhere label to imaging sheet using removable tape.


Step 7

Line up SAJ once again. Line block up with corner of SAJ and press down to attach label to block. Carefully pull off removable tape.


NOW, perfect stamped images everytime. I may be more time consuming at first, but it saves you a lot of crooked images in the future.


Happy Stamping!